By Dawna Matthews:
“Our task, regarding creativity, is to help children climb their own mountains, as high as possible. No one can do more.” — Loris Malaguzzi
Art was always present in my life as a child. I painted, glued, cut and folded. I got messy, colored outside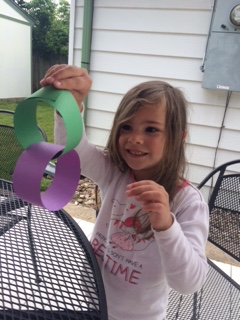 the lines, and sprinkled glitter with wild abandon. I danced precise and technical ballet moves as well as improvisational floating free forms. As I got older, my artistic side pretty much came to a jolting stop with spurts of creativity popping in here and there. I tended to be someone who observed and appreciated art instead of being the artist. When I became a parent, I started to feel a desire to create art with my child. I wanted to fill my home with joy, creativity, fun and art.
Educators teach that art encourages fine motor skills, problem solving, brain development, and that it provides an emotional outlet. Kids enjoy it because it is fun and messy. I enjoy it because I feel I can release tension as well be inspired to create new things while connecting with my daughter. I add art to our lives with easy projects that I can accomplish alongside my child. I also have art materials readily available so she can create art independently when inspiration strikes.
Here are the projects we like to make.
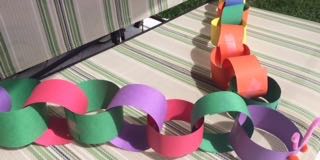
Caterpillar Chain:
This is a simple but fun art project. It helps with dexterity as well as learning about patterns. Here’s how to make yours:
Materials:
- Construction paper
- Tape/Glue
- Scissors
- Googly eyes
- Markers
- Pipe Cleaners (optional)
Instructions:
Body:
- Cut strips of construction paper about 1 inch wide and 10 inches long.
- Decide what type of pattern you want to make.
- Make your first strip of construction paper into a ring and tape or glue it together.
- Slide your next strip of construction paper through the ring, and tape or glue it into a ring.
- Repeat the process until you have a long chain of construction paper rings as long as you like.
- Antennas/Eyes/Mouth: Bend a pipe cleaner in half. Bend each end or wrap each one around a pencil to make it curly. Glue this onto the head to make two antennae. Glue googly eyes onto the front of the head or draw two eyes on it with a marker. Draw a mouth with a marker.
Ladybug Paper Plate Craft
Chloe just loved ladybugs, so we often do this one. It helps younger kids with cutting skills and creates fun with shapes.
Materials:
- Paper plate
- Red and black Markers or Paint
- Black construction Paper
- Googly eyes
Instructions:
- Cut a triangle from the paper plate.
- Use markers or paint the paper plate red. Let the plate dry.
- When the plate is dry, you can either cut out four circles or draw four circles as ladybug spots.
- Cut out a medium sized semi-circle head and a large triangle from black construction paper. Glue the triangle onto the body to make wings. If you cut a triangle from your plate, glue the black piece onto the inside of the plate; otherwise, glue it on top. Glue or draw the spots onto the wings (two on each side). Glue the semi-circle head onto the ladybug body. Glue googly eyes onto the head.
Tissue Paper Flowers
I always seem to have heaps of tissue paper in my house. Tissue paper flowers are so much fun to make and are beautiful to have in the house or to give to friends and teachers.
Materials:
- Tissue Paper – one sheet per flower
- Pipe Cleaners
- Scissors
Instructions:
Lay one to three sheets of unfolded tissue paper on a flat surface, stacking them on top of each other. Take the bottom edge and fold it over one inch. Then flip it over and fold it back on the other side. Continue folding your way up the paper one inch at a time, accordion style. Fold the accordion in half, and fold an inch and a half of a pipe cleaner around it. Then twist the pipe cleaner ends together to secure the flower to the stem. Starting with the top or bottom, fan out the tissue paper so that no sheets are stuck together, being careful not to tear it. (You are essentially unwinding your accordion at this point.) With your fan unfolded, adjust the petals by pulling them outward from each other. If needed, straighten out the petals one part at a time.
Making crafts and art with kids is a great way to to add more creative time to your life as well as allow yourself time to play. By planning just a little, you create an opportunity for your child to add art to his or her day. Once I began to embrace art again, I was able to connect with my child and help her to reach her creative potential. After an art session, we both have an improved mood (even if it was already good), and feel closer and calmer. On a personal level, I feel I have reconnected to my own inner child and am able to let go, play and be in the moment. By providing my family with art time, I am helping them use their imaginations, as well as fostering a love of creativity. Together, we are making our world a more artful place — and that is truly beautiful.